Day 23: Quidditch Is In Season
Welcome back to Laughter Jayne, and hello if your new here! I have in doing pretty good in my Harry Potter/Fantastic Beasts Challenge that I set for myself, which you can see more about here. I'm working on getting a Newt Scamander Wand DIY up, so we have a Fantastic Beasts and Where to Find Them project. Also, I should be building my bookshelves tomorrow. Yay!
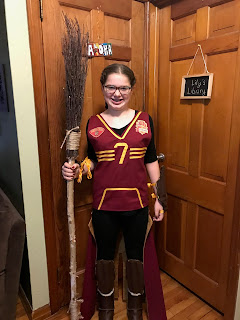
I wanted to include a tutorial of my Halloween costume, I was a Gryffindor Quidditch Player. I based how I made this from this tutorial. The link for the original has some helpful pictures. I wore this with a black shirt, black leggings, and some brown boots. I also made the arm and leg guards myself.
Gryffindor Quidditch Robes
Reading Updates:
- I finished Harry Potter and the Cursed Child(7/23)
- I started(7/23) and finished(7/23) Quidditch Through the Ages
-I started The Tales of Beetle the Bard(7/23)
Other Update:
- I watched part of Harry Potter and the Chamber of Secrets(7/23)
I wanted to include a tutorial of my Halloween costume, I was a Gryffindor Quidditch Player. I based how I made this from this tutorial. The link for the original has some helpful pictures. I wore this with a black shirt, black leggings, and some brown boots. I also made the arm and leg guards myself.
Gryffindor Quidditch Robes
Supplies:
-3 yards of maroon fabric
-1 yard yellow fabric
-1 roll thick yellow ribbon
-1 roll thin yellow ribbon
-6 bronze snaps
-Pins
-Sewing Machine
-Thread in maroon and yellow
-Iron-on transfer paper
-Printer
Directions:
-3 yards of maroon fabric
-1 yard yellow fabric
-1 roll thick yellow ribbon
-1 roll thin yellow ribbon
-6 bronze snaps
-Pins
-Sewing Machine
-Thread in maroon and yellow
-Iron-on transfer paper
-Printer
Directions:
1. Fold the maroon fabric in half. Then, fold it in quarters. This makes sure that both halves of the robes will be equal.
2. Measure the length of your torso, then cut the square out. You just cut one corner out of the non-folded side. This will be the front of your shirt. SAVE THIS PIECE.
3. Open it up with the maroon still layered. Lay the yellow over the bottom, large rectangle. Hem together all these edges.
4. Cut a slit down the center of the bottom half, and hem those edges.
5. Place front piece on top of the shirt part, and sew up the shoulders.
6. Cut and sew a neckline in the front and back pieces.
7. Now attach three bronze snaps on either side. Clip the sides together.
8. Using the thicker ribbon on the back sew two v shapes from where the top of the slit to the bottom of the shirt.
9. Sew around the neckline with the thinner ribbon.
10. Sew a number in the center on the front with the thick ribbon. Use the thinner ribbon to make three horizontal stripes from the side of the shirt to by the number.
11. On the back, use the thin ribbon to write a last name(yours or a character's), then use the thick ribbon to write a second number.
12. Your done! Grab a broomstick and your ready for a cosplay party!
So that's all the updates I had for today, and I hope you enjoyed my IKEA vlog yesterday! If you enjoy my content, follow me on Google+


I think this was your best Halloween costume ever!
ReplyDeleteWoot! Great work!
ReplyDeleteThank you!
Delete